Baseline User Guide
Notable Differences
Topic |
Description |
|---|---|
All users must apply for Baseline accounts using the MyOLCF Account Request Form. Each account must be associated with an allocated project. Your project’s PI can provide the project ID which will be used in your account request. |
|
Connections to Baseline are done via Secure Shell (SSH). |
|
Baseline is comprised of 180 nodes each with 128 cores 2x AMD 7713 processor. Compute resources are currently uniform with regard to compute, but contain a mixture of 256GB and 512GB per node memory. Batch system partitions can be used to target higher memory nodes as well as nodes purchased by research teams. |
|
Baseline utilizes the Slurm batch scheduler and is similar to other CADES resources with a few notable exceptions. Please note that each submission must specify a node count, walltime, project ID, and partition. |
|
Default modules gcc/12.4.0 & openmpi/5.0.5 are loaded upon login. As with other CADES resources, the module system can be used to modify the programming environment. |
|
Each Baseline user has access to an NFS Home and Project area as well as a GPFS scratch filesystem. Please note, Baseline does not cross-mount filesystems from other CADES resources. |
|
Because Baseline does not cross-mount other CADES filesystems, you will need to transfer all needed data onto Baseline. The NCCS OpenDTNs are available to all Baseline users to assist. For larger transfers, we recomend using the Globus endpoint, NCCS Open DTN. |
System Overview
CADES Baseline resources and services are deployed in the NCCS Open data enclave to serve ORNL researchers and their close collaborators. Baseline consists of both publicly available resources and resources that have been purchased by specific research groups. The open access portion of Baseline contains 180 nodes each with 128 cores 2X AMD 7713 processor. Baseline shares a 2.3 PB partition on the Wolf2 GPFS filesystem with other Open enclave environments for fast parallel active storage. Each baseline user will be given a 50 GB Baseline-specific home area. The open access cluster will use a fairshare scheduling approach. Research teams who wish to purchase privileged access to specific resources can reach out to the CADES director.
Node Types
On Baseline, there are two major types of nodes you will encounter: Login and Compute. While these are similar in terms of hardware, they differ considerably in their intended use.
Node Type |
Description |
|---|---|
Login |
When you connect to Baseline, you’re placed on a login node. This is the place to write/edit/compile your code, manage data, submit jobs, etc. You should never launch parallel jobs from a login node nor should you run threaded jobs on a login node. Login nodes are shared resources that are in use by many users simultaneously. |
Compute |
Most of the nodes on Baseline are compute nodes. These are where
your parallel job executes. They’re accessed via the |
Login nodes
Baseline contains 4 login nodes that are accessible through a single load balancer at baseline.ccs.ornl.gov.
Nodes |
Cores-per-node |
Processor |
Memory |
|---|---|---|---|
baseline-login[1-4] |
128 |
2x AMD 7713 |
256GB |
As detailed in the Connecting section, users can SSH into the general load balancer login node or explicitly SSH into one of the four login nodes.
Compute nodes
Baseline’s open access cluster contains 140 compute nodes in two memory configurations:
Nodes |
Cores-per-node |
Processor |
Memory |
|---|---|---|---|
baseline[1-72] |
128 |
2x AMD 7713 |
512GB |
baseline[73-140] |
128 |
2x AMD 7713 |
256GB |
As detailed in the Baseline Partition Information section, baseline[1-72] represent the batch_high_memory partition, while baseline[73-140] represent the batch_low_memory partition.
The following baseline nodes have been purchased by research groups and are reserved for their exclusive use:
Nodes |
Cores-per-node |
Processor |
Memory |
GPU |
Owner |
|---|---|---|---|---|---|
baseline[141-160] |
128 |
2x AMD 7713 |
1024GB |
N/A |
CCSI |
baseline[161-180] |
128 |
2x AMD 7713 |
512GB |
N/A |
CNMS |
baseline-gpu1 |
128 |
2x AMD 7713 |
1024GB |
8x H100 |
ACMHS |
The above nodes represent the batch_ccsi, batch_cnms, and gpu_acmhs partitions, respectively.
File system
CADES users share 2.3 PB of the Wolf2 General Parallel File System (GPFS) which sits in the NCCS Open Science enclave. Baseline mounts a stand-alone NFS-based filesystem which provides user home directories with 50 GB of storage separate from their NCCS Open Home. See Data and Storage for more information.
Note
Please note, Baseline does not cross-mount filesystems available to other CADES resources.
Operating System
Baseline is running Red Hat Enterprise Linux (RHEL).
Account and Project Applications
Active Baseline umbrella projects
Users within the Directorates / Divisions below can apply to join their respective umbrella projects. If you wish to have an umbrella project created for your Directorate or Divison, please reach out to cades-help@ornl.gov.
Project |
Directorate / Division |
|---|---|
PHY191 |
Physical Sciences Directorate (PSD) |
CSC635 |
Computing & Computational Sciences Directorate (CCSD) |
NPH166 |
Isotope Science and Engineering Directorate (ISED) |
MAT269 |
Center for Nanophase Material Sciences (CNMS) |
BIE124 |
Biosciences Division (BSD) |
CLI185 |
Climate Change Science Institute (CCSI) / Environmental Sciences Division (ESD) |
GEN193 |
Neutron Technologies Division (NTD) |
ENG159 |
Energy Science and Technology Directorate (ESTD) |
FUS179 |
Fusion and Fission Energy and Science (FFESD) |
Applying for a user account
All users must apply for an account using the Account Request Form, and apply for the Open side of the project that you want to apply for.
All accounts must be associated with an allocated project. Your project’s PI can provide the project identifier that will be used in your account request.
When our accounts team begins processing your application, you will receive an automated email containing an unique 36-character confirmation code. Make note of it; you can use it to check the status of your application at any time.
The principal investigator (PI) of the project must approve your account and system access. We will make the project PI aware of your request.
Checking the status of your application
You can check the general status of your application at any time using the myOLCF self-service portal’s account status page. For more information, see the myOLCF self-service portal documentation. If you need to make further inquiries about your application, you may email our Accounts Team at accounts@ccs.ornl.gov.
When all of the above steps are completed, your user account will be created and you will be notified by email. Now that you have a user account and it has been associated with a project, you’re ready to get to work. This website provides extensive documentation for OLCF systems, and can help you efficiently use your project’s allocation. We recommend reading the System User Guides for the machines you will be using often.
Maintaining your user account
All OLCF Users are subject to a yearly user account renewal to validate their account. Users will receive an email from our Accounts team at accounts@ccs.ornl.gov with details on how to renew your account on myOLCF. If you are currently a member of multiple Open enclave projects, submitting a renewal application for only one project will validate your user. There is no need to submit a renewal application for each project.
If a user fails to renew their account in the allotted time, a new user account application will need to be submitted.
Get access to additional projects
If you already have a user account at the Baseline, your existing credentials can be leveraged across multiple projects. You can gain access to another project by logging in to the myOLCF self-service portal and filling out the application under My Account > Join Another Project. For more information, see the myOLCF self-service portal documentation.
Once the PI of that project has been contacted and granted permission, your user account will be added to the relevant charge accounts and unix groups, and you will see these additions when you log in.
Connecting
Baseline has 4 login nodes that are configured behind a load balancer. These login nodes provide an environment for editing, compiling, and launching codes onto the compute nodes. All users will access the system through these same login nodes, and as such, running CPU or memory-intensive tasks on these nodes could interrupt service to other users. As a courtesy, we ask that you refrain from doing any analysis or visualization tasks on the login nodes.
To connect to Baseline, ssh to the load balancer at baseline.ccs.ornl.gov
ssh <username>@baseline.ccs.ornl.gov
Note
Login node resources are shared by all Baseline users. Please be courteous and limit the use of memory/cpu intensive process on the login nodes. Memory and CPU intensive as well as long running processes should be executed on Baseline’s compute resources.
Shell and Programming Environment
Default shell
A user’s default shell is selected when completing the user account request form. Currently, supported shells include:
bash |
tsch |
csh |
ksh |
zsh |
If you would like to have your default shell changed, please send an email to: cades-help@ornl.gov.
Environment Modules (Lmod)
Environment modules are provided through Lmod, a Lua-based module system for dynamically altering shell environments. By managing changes to the shell’s environment variables (such as PATH, LD_LIBRARY_PATH, and PKG_CONFIG_PATH), Lmod allows you to alter the software available in your shell environment without the risk of creating package and version combinations that cannot coexist in a single environment.
General Usage
The interface to Lmod is provided by the module command:
Command |
Description |
|---|---|
|
Shows a terse list of the currently loaded modules |
|
Shows a table of the currently available modules |
|
Shows help information about |
|
Shows the environment changes made by the |
|
Searches all possible modules according to |
|
Loads the given |
|
Adds |
|
Removes |
|
Unloads all modules |
|
Resets loaded modules to system defaults |
|
Reloads all currently loaded modules |
Searching for Modules
Modules with dependencies are only available when the underlying dependencies, such as compiler families, are loaded. Thus, module avail will only display modules that are compatible with the current state of the environment. To search the entire hierarchy across all possible dependencies, the spider sub-command can be used as summarized in the following table.
Command |
Description |
|---|---|
|
Shows the entire possible graph of modules |
|
Searches for modules named |
|
Searches for a specific version of |
|
Searches for modulefiles containing |
Compiling
Available compilers:
The following compilers are available on Baseline:
Intel, oneAPI compiler suite
GCC, the GNU compiler collection (default)
AOCC, AMD Optimized C/C++ compiler
Upon login, default version of the GCC compiler and OpenMPI are automatically added to each user’s environment. Users do not need to make any environment changes to use the default version of gcc and openmpi.
If a different compiler is required, it is important to use the correct environment for each compiler. To aid users in pairing the correct compiler and environment, the module system on baseline automatically pulls in libraries compiled with a given compiler when changing compilers. The compiler modules will load the correct pairing of compiler version, message passing libraries, and other items required to build and run code.
To change the default loaded gcc environment to the intel environment for example, use:
$ module load oneapi
This will automatically unload the current compiler and system libraries associated with it, load the new compiler environment and automatically load associated system libraries as well.
Additional compiler modules can be found in the LMOD Availiable modules:
$ module avail
Running Jobs
On Baseline, computational work is performed by jobs. Timely, efficient execution of these jobs is the primary concern of operation in any HPC system.
A job on a commodity cluster such as Baseline typically comprises a few different components:
A batch submission script
A binary executable
A set of input files for the executable
A set of output files created by the executable
The process for running a job, in general, is to:
Prepare executables and input files.
Write a batch script.
Submit the batch script to the batch scheduler.
Optionally monitor the job before and during execution.
The following sections describe in detail how to create, submit, and manage jobs for execution on Baseline.
Login vs Compute Nodes on Baseline
When you initially log into baseline, you are placed on a login node. Login node resources are shared among all users of the sysetm. Because of this, you should be mindful when performing tasks on a login node and in particular should avoid long-running, memory-intensive, or many-core tasks on login nodes.
Login nodes should be used for basic tasks such as file editing, code compilation, data backup, and job submission. Login nodes should not be used for memory- or compute-intensive tasks. Users should also limit the number of simultaneous tasks performed on the login resources. For example, a user should not run (10) simultaneous tar processes on a login node.
Note
Special attention should be given to “make -j” which will by default launch one task for each core on the node. You should specify a limit such as “make -j 4” to limit the impact to other users on the login node.
The majority of nodes on Baseline are compute nodes. Compute nodes are the appropriate place for resource-intensive (long-running, memory-intensive, or many-core) tasks. Compute nodes are accessed via the Slurm Workload Manager. There are several ways to access compute nodes with Slurm: by directly running a parallel task with srun, by starting an interactive-batch session with salloc, or by lauching a batch script with sbatch. These are described below.
Slurm
Baseline uses the Slurm batch scheduler. This section describes submitting and managing jobs within Slurm.
Batch Scripts
Batch scripts, or job submission scripts, are the most common mechanism by which a user configures and submits a job for execution. A batch script is simply a shell script that also includes directives to be interpreted by the batch scheduling software (e.g. Slurm).
Batch scripts are submitted to the batch scheduler, where they are then parsed for the scheduling configuration options. The batch scheduler then places the script in the appropriate queue, where it is designated as a batch job. Once the batch jobs makes its way through the queue, the script will be executed on the compute nodes.
Components of a Batch Script
Batch scripts are parsed into the following (3) sections:
Interpreter Line
The first line of a script can be used to specify the script’s interpreter; this
line is optional. If not used, the submitter’s default shell will be used. The
line uses the hash-bang syntax, i.e., #!/path/to/shell.
Slurm Submission Options
The Slurm submission options are preceded by the string #SBATCH, making them
appear as comments to a shell. Slurm will look for #SBATCH options in a
batch script from the script’s first line through the first non-comment line. A
comment line begins with #. #SBATCH options entered after the first
non-comment line will not be read by Slurm.
Shell Commands
The shell commands follow the last #SBATCH option and represent the
executable content of the batch job. If any #SBATCH lines follow executable
statements, they will be treated as comments only.
The execution section of a script will be interpreted by a shell and can contain multiple lines of executables, shell commands, and comments. when the job’s queue wait time is finished, commands within this section will be executed on the primary compute node of the job’s allocated resources. Under normal circumstances, the batch job will exit the queue after the last line of the script is executed.
Example Batch Script
The most common way to interact with the batch system is via batch scripts. A batch script is simply a shell script with added directives to request various resoruces from or provide certain information to the scheduling system. Aside from these directives, the batch script is simply the series of commands needed to set up and run your job.
Consider the following batch script:
 1#!/bin/bash
 2#SBATCH -A ABC123
 3#SBATCH -J test
 4#SBATCH -o %x-%j.out
 5#SBATCH -t 1:00:00
 6#SBATCH -p batch
 7#SBATCH -N 2
 8
 9cd $SLURM_SUBMIT_DIR
10srun ...
In the script, Slurm directives are preceded by #SBATCH, making them appear as comments to the shell. Slurm looks for these directives through the first non-comment, non-whitespace line. Options after that will be ignored by Slurm (and the shell).
Line |
Description |
|---|---|
1 |
Shell interpreter line |
2 |
CADES project to charge |
3 |
Job name |
4 |
Job standard output file ( |
5 |
Walltime requested (in |
6 |
Partition (queue) to use |
7 |
Number of compute nodes requested |
8 |
Job Memory |
9 |
Blank Line |
10 |
Change into the run directory |
11 |
Run the job ( add layout details ) |
Batch scripts can be submitted for execution using the sbatch command.
For example, the following will submit the batch script named test.slurm:
sbatch test.slurm
Note
You must submit your batch job with the sbatch command. If you simply run it like a normal shell script (e.g. “./test.slurm”), it will run on the login node and will not properly allocate resources on the compute nodes.
If successfully submitted, a Slurm job ID will be returned. This ID can be used to track the job. It is also helpful in troubleshooting a failed job; make a note of the job ID for each of your jobs in case you must contact cades-help@ornl.gov for support.
Interactive Batch Jobs
Batch scripts are useful when one has a pre-determined group of commands to execute, the results of which can be viewed at a later time. However, it is often necessary to run tasks on compute resources interactively.
Users are not allowed to access cluster compute nodes directly from a login node. Instead, users must use an interactive batch job to allocate and gain access to compute resources. This is done by using the Slurm salloc command. Other Slurm options are passed to salloc on the command line as well:
$ salloc -A ABC123 -p batch -N 4 -t 1:00:00
This request will:
|
Start an interactive session |
|
Charge to the |
|
Run in the |
|
request (4) nodes… |
|
…for (1) hour |
After running this command, the job will wait until enough compute nodes are available, just as any other batch job must. However, once the job starts, the user will be given an interactive prompt on the primary compute node within the allocated resource pool. Commands may then be executed directly (instead of through a batch script).
Debugging
A common use of interactive batch is to aid in debugging efforts. interactive access to compute resources allows the ability to run a process to the point of failure; however, unlike a batch job, the process can be restarted after brief changes are made without losing the compute resource pool; thus speeding up the debugging effort.
Choosing a Job Size
Because interactive jobs must sit in the queue until enough resources become available to allocate, it is useful to know when a job can start.
Use the sbatch --test-only command to see when a job of a specific size could be scheduled. For example, the snapshot below shows that a (2) node job would start at 10:54.
$ sbatch --test-only -N2 -t1:00:00 batch-script.slurm

  sbatch: Job 1375 to start at 2023-10-06T10:54:01 using 64 processors on nodes baseline[100-101] in partition batch_all
Note
The queue is fluid, the given time is an estimate made from the current queue state and load. Future job submissions and job completions will alter the estimate.
Common Batch Options to Slurm
The following table summarizes frequently-used options to Slurm:
Option |
Use |
Description |
|---|---|---|
|
|
Causes the job time to be charged to |
|
|
Number of compute nodes to allocate.
Jobs cannot request partial nodes.
|
|
|
Maximum wall-clock time. |
|
|
Allocates resources on specified partition.
|
|
|
Writes standard output to |
|
|
Writes standard error to |
|
|
Sends email to the submitter when the job fails. |
|
Sends email to the submitter when the job begins. |
|
|
Sends email to the submitter when the job ends. |
|
|
|
Specifies email address to use for
|
|
|
Sets the job name to |
|
|
Exports all environment variables from the
submitting shell into the batch job shell.
Since the login nodes differ from the service
nodes, using the |
|
|
Declare to use all the available memory of the node |
Further details and other Slurm options may be found through the sbatch man page.
Batch Environment Variables
Slurm sets multiple environment variables at submission time. The following Slurm variables are useful within batch scripts:
Variable |
Description |
|---|---|
|
The directory from which the batch job was submitted.
By default, a new job starts in your home directory.
You can get back to the directory of job submission
with |
|
The job’s full identifier. A common use for
|
|
The number of nodes requested. |
|
The job name supplied by the user. |
|
The list of nodes assigned to the job. |
Modifying Batch Jobs
The batch scheduler provides a number of utility commands for managing submitted jobs. See each utilities’ man page for more information.
Removing and Holding Jobs
Jobs in the queue in any state can be stopped and removed from the queue
using the command scancel.
$ scancel 1234
Jobs in the queue in a non-running state may be placed on hold using the
scontrol hold command. Jobs placed on hold will not be removed from the
queue, but they will not be eligible for execution.
$ scontrol hold 1234
Once on hold the job will not be eligible to run until it is released to
return to a queued state. The scontrol release command can be used to
remove a job from the held state.
$ scontrol release 1234
Monitoring Batch Jobs
Slurm provides multiple tools to view queue, system, and job status. Below are the most common and useful of these tools.
Job Monitoring Commands
The Slurm utility squeue can be used to view the batch queue.
To see all jobs currently in the queue:
$ squeue -l
To see all of your queued jobs:
$ squeue -l -u $USER
The Slurm utility sacct can be used to view jobs currently in the queue and
those completed within the last few days. The utility can also be used to see
job steps in each batch job.
To see all jobs currently in the queue:
$ sacct -a -X
To see all jobs including steps owned by userA currently in the queue:
$ sacct -u userA
To see all steps submitted to job 123:
$ sacct -j 123
To see all of your jobs that completed on 2023-10-10:
$ sacct -S 2023-10-10T00:00:00 -E 2023-10-10T23:59:59 -o"jobid,user,account%16,cluster,AllocNodes,Submit,Start,End,TimeLimit" -X -P
The scontrol show job <jobid> utility provides additional details of given job.
baseline-login> scontrol show job <jobid>
The sview tool provide a graphical queue monitoring tool. To use, you will
need an X server running on your local system. You will also need to tunnel X
traffic through your ssh connection:
local-system> ssh -Y username@baseline-login.ccs.ornl.gov
baseline-login> sview
Job Execution
Once resources have been allocated through the batch system, users have the
option of running commands on the allocated resources’ primary compute node (a
serial job) and/or running an MPI/OpenMP executable across all the resources in
the allocated resource pool simultaneously (a parallel job). The parallel jobs are
run with the srun command.
Serial Job Execution
The executable portion of batch scripts is interpreted by the shell specified on the first line of the script. If a shell is not specified, the submitting user’s default shell will be used.
The serial portion of the batch script may contain comments, shell commands, executable scripts, and compiled executables. These can be used in combination to, for example, navigate file systems, set up job execution, run serial executables, and even submit other batch jobs.
For example in the below job script, the lines cd /gpfs/wolf2/cades/stf007/scratch/76a/importantdata
and date are executed serially. The srun -n 8 ./a.out
starts the parallel job - launching 8 tasks running a.out.
 1 #!/bin/bash
 2 #SBATCH -A abc123
 3 #SBATCH -J test
 4 #SBATCH -p batch
 5 #SBATCH -N 2
 6 #SBATCH -t 1:00:00
 7
 8
 9 cd /gpfs/wolf2/cades/stf007/scratch/76a/importantdata
10 date
11
12 srun -n 8 --tasks-per-node 4 ./a.out
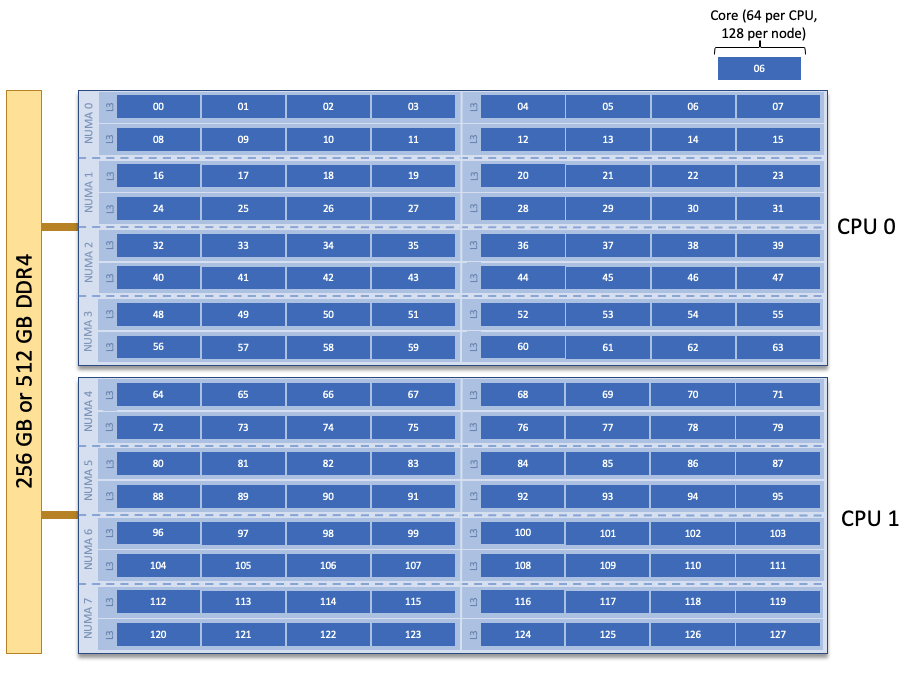
CADES Baseline Compute Node Description
The following image represents a high level compute node that will be used below to display layout options. In the diagram, we see two CPUs. Each physical core on a Baseline compute node is represented by a blue box. The number in the blue box represents the core id.
Using srun
By default, commands will be executed on the job’s primary compute node,
sometimes referred to as the job’s head node. The srun command is used to
execute an MPI binary on one or more compute nodes in parallel.
srun accepts the following common options:
|
Minimum number of nodes |
|
Total number of MPI tasks (total across all nodes). Default is 1 |
|
Cores per MPI task. Default is 1 |
|
Controls task distribution across
nodes and cores. Default is |
Note
If you do not specify the number of MPI tasks to srun
via -n, the system will default to using only one task per node.
All the flags and other information about srun can be seen in the srun man page.
Run man srun to see this page.
MPI Task Layout (srun Examples)
Each compute node on CADES Baseline has two CPUs with 64 cores each, and 2 hardware threads on each core. Depending on your job, it may be useful to control task layout within and across nodes.
For the examples we will see below, we will use be using the following code hello_mpi_omp.c
 1 /* -------------------------------------------------------------
 2 MPI + OpenMP Hello, World program to help understand process
 3 and thread mapping to physical CPU cores and hardware threads
 4 ------------------------------------------------------------- */
 5 #define _GNU_SOURCE
 6
 7 #include <stdio.h>
 8 #include <mpi.h>
 9 #include <sched.h>
10 #include <omp.h>
11
12 int main(int argc, char *argv[]){
13
14     MPI_Init(&argc, &argv);
15
16     int size;
17     MPI_Comm_size(MPI_COMM_WORLD, &size);
18
19     int rank;
20     MPI_Comm_rank(MPI_COMM_WORLD, &rank);
21
22     char name[MPI_MAX_PROCESSOR_NAME];
23     int resultlength;
24     MPI_Get_processor_name(name, &resultlength);
25
26     int hwthread;
27     int thread_id = 0;
28
29     #pragma omp parallel default(shared) private(hwthread, thread_id)
30     {
31         thread_id = omp_get_thread_num();
32         hwthread  = sched_getcpu();
33
34         printf("MPI %03d - OMP %03d - Core %03d - Node %s\n", rank, thread_id, hwthread, name);
35     }
36
37     MPI_Finalize();
38
39     return 0;
40 }
This can be compiled with mpicc -fopenmp -o hello_mpi_omp hello_mpi_omp.c
Task Distribution
The following will run 8 copies of hello_mpi_omp, one per CPU, two per node with physical core binding:
$ export OMP_NUM_THREADS=1
$ srun -N2 -n4 ./hello_mpi_omp | sort
MPI 000 - OMP 000 - Core 000 - Node baseline5.ccs.ornl.gov
MPI 001 - OMP 000 - Core 123 - Node baseline5.ccs.ornl.gov
MPI 002 - OMP 000 - Core 001 - Node baseline6.ccs.ornl.gov
MPI 003 - OMP 000 - Core 120 - Node baseline6.ccs.ornl.gov
In the output:
MPI xyzrefers to the MPI task idOMP xyzrefers to the OpenMP thread within a task (a single MPI task can run multiple OpenMP threads)Core xyzrefers to the id of the core in the CPU where the task’s thread or the task’s OpenMP thread is assignedNode baselineX.ccs.ornl.govis the hostname of the compute node where the task is placed.
You’ll notice that srun equally distributes the tasks between the two nodes baseline5
and baseline6, assigning
the first two tasks to the first node, the next two to the next node.
The task assignment to the nodes can be controlled by the --distribution flag. The default is
block distribution which is what we see in the above example.
If you want tasks to be assigned to each node in a round robin fashion, you can set --distribution=cyclic
$ export OMP_NUM_THREADS=1
$ srun -N2 -n4 --distribution=cyclic ./hello_mpi_omp | sort
MPI 000 - OMP 000 - Core 062 - Node baseline5.ccs.ornl.gov
MPI 001 - OMP 000 - Core 016 - Node baseline6.ccs.ornl.gov
MPI 002 - OMP 000 - Core 120 - Node baseline5.ccs.ornl.gov
MPI 003 - OMP 000 - Core 120 - Node baseline6.ccs.ornl.gov
Here you can see that the task distribution alternates between baseline5 and baseline6.
Multiple Cores Per Task
By default, each MPI task is assigned 1 core. If you need multiple cores per task, you can use
the -c (--cpus-per-task) flag. In the example below, we run 2 OpenMP threads per task
and want to assign each thread its own core, so we set -c 4. Explicitly setting the -c
flag will also assign cores in an orderly manner, rather than somewhat randomly as you saw in the
previous examples.
$ export OMP_NUM_THREADS=2
$ srun -N2 -n4 -c2  ./hello_mpi_omp | sort
MPI 000 - OMP 000 - Core 000 - Node baseline3.ccs.ornl.gov
MPI 000 - OMP 001 - Core 001 - Node baseline3.ccs.ornl.gov
MPI 001 - OMP 000 - Core 065 - Node baseline3.ccs.ornl.gov
MPI 001 - OMP 001 - Core 064 - Node baseline3.ccs.ornl.gov
MPI 002 - OMP 000 - Core 001 - Node baseline4.ccs.ornl.gov
MPI 002 - OMP 001 - Core 000 - Node baseline4.ccs.ornl.gov
MPI 003 - OMP 000 - Core 065 - Node baseline4.ccs.ornl.gov
MPI 003 - OMP 001 - Core 064 - Node baseline4.ccs.ornl.gov
In the above example, we see that each MPI task is assigned two distinct cores.
We also see that for the two MPI tasks assigned to baseline3, MPI 000 is
given Core 0 and 1 (which is on CPU 0 on the node) but MPI 001 is given Core
64 and 65 which is on CPU 1. It’s similar for baseline4. This is because we
don’t set the --distribution flag, so it assumes its default value
block:cyclic:cyclic. The format of the --distribution flag value is
<val>:<val>:<val>. The first <val> tells how to distribute the tasks
across the nodes (which we discussed earlier in the Task Distribution section).
The second <val> tells how to distribute the tasks across the 2 CPUs on a
single node. The third <val> can be omitted since that is only applicable
for CPUs that use more than one hardware thread per core.
We can see that we get the same output as the previous example if we explicitly set
--distribution=block:cyclic.
$ export OMP_NUM_THREADS=2
$ srun -N2 -n4 -c2  --distribution=block:cyclic ./hello_mpi_omp | sort
MPI 000 - OMP 000 - Core 001 - Node baseline3.ccs.ornl.gov
MPI 000 - OMP 001 - Core 000 - Node baseline3.ccs.ornl.gov
MPI 001 - OMP 000 - Core 064 - Node baseline3.ccs.ornl.gov
MPI 001 - OMP 001 - Core 065 - Node baseline3.ccs.ornl.gov
MPI 002 - OMP 000 - Core 001 - Node baseline4.ccs.ornl.gov
MPI 002 - OMP 001 - Core 000 - Node baseline4.ccs.ornl.gov
MPI 003 - OMP 000 - Core 065 - Node baseline4.ccs.ornl.gov
MPI 003 - OMP 001 - Core 064 - Node baseline4.ccs.ornl.gov
You can see that the two tasks assigned to baseline3 span both CPUs (see the compute
node diagram to see where each core is located) because of the second value cyclic in
--distribution. Similarly for baseline4. What if we set --distribution=block:block
instead?
$ export OMP_NUM_THREADS=2
$ srun -N2 -n4 -c2  --distribution=block:block ./hello_mpi_omp | sort
MPI 000 - OMP 000 - Core 000 - Node baseline3.ccs.ornl.gov
MPI 000 - OMP 001 - Core 001 - Node baseline3.ccs.ornl.gov
MPI 001 - OMP 000 - Core 002 - Node baseline3.ccs.ornl.gov
MPI 001 - OMP 001 - Core 003 - Node baseline3.ccs.ornl.gov
MPI 002 - OMP 000 - Core 000 - Node baseline4.ccs.ornl.gov
MPI 002 - OMP 001 - Core 001 - Node baseline4.ccs.ornl.gov
MPI 003 - OMP 000 - Core 002 - Node baseline4.ccs.ornl.gov
MPI 003 - OMP 001 - Core 003 - Node baseline4.ccs.ornl.gov
We see that the tasks on baseline3 are all assigned to cores on CPU 0 because we set block
as the second value for --distribution.
Multiple Simultaneous Jobsteps
Multiple simultaneous sruns can be executed within a batch job by placing each
srun in the background.
 1#!/bin/bash
 2#SBATCH -N 2
 3#SBATCH -t 1:00:00
 4#SBATCH -A prj123
 5#SBATCH -J simultaneous-jobsteps
 6
 7srun -n16 -N2 -c1  --exclusive ./a.out &
 8srun -n8 -N2 -c1  --exclusive ./b.out &
 9srun -n4 -N1 -c1  --exclusive ./c.out &
10wait
Note
The wait command must be used in a batch script
to prevent the shell from exiting before all backgrounded
sruns have completed.
Warning
The --exclusive flag must be used to prevent
resource sharing. Without the flag each backgrounded srun
will likely be placed on the same resources.
Baseline Partition Information
The baseline partitions are as follows:
Partition Name |
Node Count |
Max wall time |
Open Access |
Owner |
|---|---|---|---|---|
|
128 |
24h |
Yes |
Cades |
|
68 |
24h |
Yes |
Cades |
|
70 |
24h |
Yes |
Cades |
|
20 |
24h |
No |
CCSI |
|
20 |
24h |
No |
CNMS |
|
1 |
24h |
No |
ACMHS |
Scheduling policy
Baseline’s scheduling policy is a modified Fair-Share with limits on maximum walltime. This policy will be updated as needed to keep thoughput for jobs moving.
Usage of these partitions is tracked and charged via core-hours used per job.
CADES Team will consider requests for reservation for urgent deadlines or realtime experiments. If reservations become a disruption to other users we reserve the right limit them. The Resource Utilization Council (RUC) will help us decide reservation approvals.
Software
Software News
Baseline: New Default Software (August 19, 2025)
Baseline’s software stack has been upgraded to the latest default version, aligning it with other OLCF supported machines and introducing new packages and features.
The new stack brings updated versions of the following packages:
Package |
Old Module |
New Module(s) |
|---|---|---|
GCC |
gcc/12.2.0 |
gcc/12.4.0, gcc/13.3.0 |
Intel |
intel/20.0.4 |
oneapi/2024.1.0, oneapi/2025.1.1 |
AOCC |
aocc/4.1.0 |
aocc/5.0.0 (experimental) |
OpenMPI |
openmpi/4.0.4 |
openmpi/5.0.5 |
Conda |
python/3.11-Anaconda |
miniforge3/24.11.3-0 |
In addition to the default modules changing, core software (i.e., software independent of compiler type/version) will be in a default module called Core/25.05 with the version being in the format year/month. We have also provided many of the packages currently being used on CADES Open to make onboarding to Baseline easier.
Finally, this new software stack comes with support for VASP/6.5.1 on Baseline. Access to VASP can be requested by emailing cades-help@ornl.gov with your license information.
Note
If you are having issues with the new default software stack, you can downgrade to the previous version of the Baseline software stack by running the command source /sw/baseline/init/profile. Please note that this version has been deprecated and will not be receiving any updates moving forward.
Python on Baseline
Python is heavily used on CADES. Some users require specific versions of Python or packages, which may further depend on numerous other Python packages. Because of all the dependencies that some Python packages require, and all the types of data that exist, it can be quite troublesome to get different Python installations to “play nicely” with each-other, especially on an HPC system where the system environment is complicated. Conda, a package and virtual environment manager from the conda-forge distribution, helps alleviate these issues. Conda allows users to easily install different versions of binary software packages and any required libraries appropriate for their computing platform. To start using the new python-conda environment on CADES, all you need to do is load the module:
module load miniforge3/24.11.3-0
Loading the Python module will put you in a “base” pre-configured conda environment. This option is recommended for users who do not need custom environments, and only require packages that are already installed in the base environment. This option is also recommended for users that just need a Python interpreter or standard packages.
Users can also create their own custom conda environment after loading the Python module. This option is recommended for users that require a different version of Python than the default version available, or for users that want a personal environment to manage specialized packages.
module load miniforge3/24.11.3-0
conda create -p /path/to/my_env python=3.11
source activate /path/to/my_env
Now that you have a fresh conda environment, you can install new package like mpi4py your new environment
pip install mpi4py
When submitting a batch script, $PATH issues are known to occur if not submitting from a fresh
login shell, which can result in the wrong environment being detected. To avoid this, you must use
the --export=NONE flag during job submission and use unset SLURM_EXPORT_ENV in your job
script (before calling srun), which ensures that no previously set environment variables are
passed into the batch job, but makes sure that srun can still find your python path:
sbatch --export=NONE submit.sl
This means you will have to load your modules and activate your environment inside the batch script. An example batch script for is provided below:
#!/bin/bash
#SBATCH -A XXXXXXX
#SBATCH -p XXXXXXX
#SBATCH -N 2
#SBATCH -n 4
#SBATCH -c 1
#SBATCH -J test-job
#SBATCH --mem=0
#SBATCH -t 5:00

# Only necessary if submitting like: sbatch --export=NONE ... (recommended)
# Do NOT include this line when submitting without --export=NONE
unset SLURM_EXPORT_ENV

cd $SLURM_SUBMIT_DIR
date

module load miniforge3/24.11.3-0
source activate your_env
python script.py
Visualizing by Paraview
ParaView is an open-source, multi-platform data analysis and visualization application. ParaView users can quickly build visualizations to analyze their data using qualitative and quantitative techniques.
Launch ParaView on laptop (must be the same version as remote):
In ParaView: File →Connect →Add Server:
Name: Pick a name
Server Type: Client/Server
Host: localhost Port: 11111
        - press Configure button
        - Startup Type: Manual
        - click Save
Open a local terminal
ssh <username>@baseline-login1.ccs.ornl.gov
Start a job and get a compute node (say or-condo-c57):
[uid@baseline-login1 ~]$ srun -A XXXXX -p batch_all -N 1 -n 1 -c 1 – mem=8G -t 1:00:00 --pty /bin/bash
srun: job 2575867 queued and waiting for resources
srun: job 2575867 has been allocated resources
Launch the server:
[uid@or-condo-c57 ~]$ module load paraview/5.8.0
[uid@or-condo-c57 ~]$ pvserver --force-offscreen-rendering
Waiting for client...
Connection URL: cs://or-condo-c57.ornl.gov:11111
Accepting connection(s): or-condo-c57.ornl.gov:11111
Open a 2nd local TERMINAL 2:
ssh -L 11111:localhost:11111 username@baseline-login1.ccs.ornl.gov
ssh -L 11111:localhost:11111 or-condo-c57.ornl.gov
Launch ParaView on Laptop:
Connect to server you made previously in the ParaView GUI. If successful, you’ll see in “Terminal 1” a message that says “Client connected”
[uid@or-condo-c57 ~]$ pvserver --force-offscreen-rendering
Waiting for client...
Connection URL: cs://or-condo-c57.ornl.gov:11111
Accepting connection(s): or-condo-c57.ornl.gov:11111
Client connected.
Container Usage
Apptainer v1.2.5 is installed on Baseline. Apptainer can be used for both building and running containers on Baseline. The main user documentation on how to use Apptainer can be found here. This section of our documentation will only cover any additional info that you might need to make containers run correctly on Baseline.
Note
The best practices will continue to evolve over time, so this section will likely change as we identify better ways of building and running containers on Baseline. If you find something that you were doing is no longer working, check back here to see if the documentation has been updated with new instructions.
Example Build and Run Workflow
This section will demonstrate how to build a container with openMPI and run a simple MPI example
Building and running a container with Rocky and OpenMPI
Create a directory named
mpiexamplein your home directory or in Wolf2 andcdinto it.Create a file
mpiexample.cwith the following contents.#include <stdio.h> #include <mpi.h> int main (int argc, char *argv[]) { int rank, size; MPI_Comm comm; comm = MPI_COMM_WORLD; MPI_Init (&argc, &argv); MPI_Comm_rank (comm, &rank); MPI_Comm_size (comm, &size); printf("Hello from rank %d\n", rank); MPI_Barrier(comm); MPI_Finalize(); }
Create a file named
rockyopenmpi.defwith the following contentsBootstrap: docker From: rockylinux:9 %environment # Point to OMPI binaries, libraries, man pages export OMPI_DIR=/opt/ompi export PATH="$OMPI_DIR/bin:$PATH" export LD_LIBRARY_PATH="$OMPI_DIR/lib:$LD_LIBRARY_PATH" export MANPATH="$OMPI_DIR/share/man:$MANPATH" %files mpiexample.c /opt/mpiexample.c %post echo "Installing required packages..." dnf install -y wget sudo git gzip gcc gcc-g++ gcc-gfortran ucx-devel libibverbs librdmacm-devel pmix-devel echo "Installing Open MPI" export OMPI_DIR=/opt/ompi export OMPI_VERSION=4.0.4 export OMPI_URL="https://download.open-mpi.org/release/open-mpi/v4.0/openmpi-$OMPI_VERSION.tar.gz" mkdir -p /ompi mkdir -p /opt # Download cd /ompi && wget -O openmpi-$OMPI_VERSION.tar.gz $OMPI_URL && tar -xzf openmpi-$OMPI_VERSION.tar.gz # Compile and install cd /ompi/openmpi-$OMPI_VERSION && ./configure --prefix=$OMPI_DIR --with-ucx --with-pmix make -j$(nproc) install # Set env variables so we can compile our application export PATH=$OMPI_DIR/bin:$PATH export LD_LIBRARY_PATH=$OMPI_DIR/lib:$LD_LIBRARY_PATH rm -rf /ompi cd /opt && mpicc -o mpiexample mpiexample.c
Build the container image
apptainer build rockyopenmpi.sif rockyopenmpi.defThis builds a container with Rocky Linux 9 and installs OpenMPI 4.0.4 (which is the current default on Baseline). It copies the file
mpiexample.cinto the image in the/appdirectory in the image and compiles it to an executable namedmpiexamplein the/appdirectory.Apptainer builds the container image in the SIF file format. Unlike Podman, Apptainer gives you a single file for your image that you can later run as your container.
Running the container in a batch job
Create a file named
submit.sl#!/bin/bash #SBATCH -t01:20:00 #SBATCH -Astf007uanofn #SBATCH -N4 #SBATCH -J apptainer_test #SBATCH -o %x_%j.out #SBATCH -e %x_%j.out #SBATCH -p batch module load openmpi export APPTAINERENV_LD_LIBRARY_PATH="$LD_LIBRARY_PATH" export APPTAINER_BIND="/sw/baseline,/opt/mellanox,/var/spool/slurm,/etc/slurm,$(pwd)" export APPTAINER_CONTAINLIBS="/lib64/libpmi.so.0,/lib64/libpmi2.so.0,/usr/lib64/libslurm.so,/usr/lib64/slurm/libslurm_pmi.so,/usr/lib64/slurm/libslurmfull.so,/lib64/librdmacm.so.1,/lib64/libibverbs.so.1,/lib64/libucp.so.0,/lib64/libuct.so.0,/lib64/libucm.so.0,/lib64/libucs.so.0,/lib64/libpmi2.so.0,/lib64/libpmi.so.0,/usr/lib64/slurm/libslurm_pmi.so,/lib64/libnl-3.so.200,/lib64/libnl-route-3.so.200 " srun -N4 -n8 --tasks-per-node 2 apptainer exec --workdir `pwd` rockyopenmpi.sif /opt/mpiexample
The
exportlines are required in order to bind the host’s MPI libraries into the container in order for MPI to work correctly.
Submit a batch job with
sbatch submit.slThe output of the job should look something like
...
<several INFO messages that can be ignored>
Hello from rank 7
Hello from rank 6
Hello from rank 2
Hello from rank 0
Hello from rank 1
Hello from rank 3
Hello from rank 5
Hello from rank 4
Note
MPI performance with containers is slower than bare metal MPI. We are working on finding ways to improve performance.
Data and Storage
Baseline has three different types of associated storage with each option optimized for different stages of the data lifecycle. Please make note of the filesystem layout as it differs from other CADES systems. Baseline uses a project-centric filesystem layout on GPFS, as well as a user-centric home storage area on NFS. A third archival storage option is in the planning stages and will be available in the future.
NFS Home Area Storage
Upon login users land in their personal home area, which is hosted on a Network File system (NFS). Each user has a hard quota of 50 GB for their home area. Please note that this Home area is a stand-alone Home area for CADES Baseline. It is not the same Home area as your OLCF/NCCS Open Home area. If you need to access data from the NCCS OpenDTNs, the data will need to be moved to Wolf2.
User Home areas are designed to be the place where users keep actively used application codes, scripts, and starting data for applications. It is read-only from the compute nodes, meaning that the compute nodes cannot write data directly to the NFS home areas. This is because there is a fast parallel filesystem that is specifically optimized for parallel data I/O.
Projects are provided with a Project Home storage area in the NFS-mounted filesystem. This area is intended for storage of data, code, and other files that are of interest to all members of a project. Since Project Home is an NFS-mounted filesystem, its performance will not be as high as other filesystems.
Area |
Path |
Type |
Permissions |
Quota |
Backups |
Purged |
Retention |
On Compute Nodes |
|---|---|---|---|---|---|---|---|---|
User Home |
|
NFS |
User set |
50 GB |
Yes |
No |
90 days |
Yes (read-only) |
Project Home |
|
NFS |
770 |
50 GB |
Yes |
No |
90 days |
Yes (read-only) |
The environment variable $HOME will always point to your current home directory. It is recommended, where possible, that you use this variable to reference your home directory. In cases in which using $HOME is not feasible, it is recommended that you use /ccsopen/home/$USER.
Users should note that since this is an NFS-mounted filesystem, its performance will not be as high as other filesystems.
Note
We strongly recommend users copy necessary files (applications, scripts, input files, etc.) from NFS to the GPFS Wolf2 parallel filesystem and launch their jobs from there due to its larger storage capacity and superior performance.
Fast Parallel Scratch Storage
CADES users share 2.3 PB of the Wolf2 General Parallel File System (GPFS) which sits in the NCCS Open Science enclave. This is the scratch area for active data generated by user applications. GPFS is ideal for the parallel reads and writes done by HPC codes.
Wolf2 GPFS is not designed for long term storage and files that have not been accessed or modified in the last 90 days are continually purged. Users will want to move valuable data and codes off of Wolf2 as soon as they are no longer needed for an active simulation or analysis campaign. There are no backups for data stored on the GPFS Wolf2 parallel filesystem.
GPFS Filesystem
To facilitate collaboration among researchers, Baseline provides three distinct types of project-centric work storage areas: Member Work directories, Project Work directories, and World Work directories. Each directory should be used for storing files generated by computationally-intensive HPC jobs related to a project.
Area |
Path |
Type |
Permissions |
Quota |
Backups |
Purged |
Retention |
On Compute Nodes |
|---|---|---|---|---|---|---|---|---|
Member Work |
|
Spectrum Scale |
700 |
50 TB |
No |
90 days |
N/A |
Yes (read/write) |
Project Work |
|
Spectrum Scale |
770 |
50 TB |
No |
90 days |
N/A |
Yes (read/write) |
World Work |
|
Spectrum Scale |
775 |
50 TB |
No |
90 days |
N/A |
Yes (read/write) |
Persistent and Archival Storage
CADES Baseline offers access to the Themis GPFS filesystem for archival storage. Allocations on Themis can be requested by contacting cades-help@ornl.gov.
Data Transfer
Globus
Baseline users have access to a set of Data Transfer Nodes named opendtn.ccs.ornl.gov, which can be accessed by Globus. The OpenDTN resource can see the shared scratch GPFS named Wolf2 and are configured for data transfer. By selecting one of these OpenDTNs and some offsite endpoint, you can use Globus to transfer data to/from that storage area.
Globus Warnings:
Globus transfers do not preserve file permissions. Arriving files will have (rw-r–r–) permissions, meaning arriving files will have user read and write permissions and group and world read permissions. Note that the arriving files will not have any execute permissions, so you will need to use chmod to reset execute permissions before running a Globus-transferred executable.
Globus will overwrite files at the destination with identically named source files. This is done without warning.
Globus has restriction of 8 active transfers across all the users. Each user has a limit of 3 active transfers, so it is required to transfer a lot of data on each transfer than less data across many transfers.
If a folder is constituted with mixed files including thousands of small files (less than 1MB each one), it would be better to tar the small files. Otherwise, if the files are larger, Globus will handle them.
Below is a summary of the steps for data transfer:
Login to globus.org using your globus ID and password. If you do not have a globusID, set one up here: Generate a globusID
Once you are logged in, Globus will open the “File Manager” page. Click the left side “Collection” text field in the File Manager and type “NCCS Open DTN”. When prompted, authenticate into the NCCS Open DTN endpoint using your UCAMS/XCAMS username and password.
Click in the left side “Path” box in the File Manager and enter the path to your data on Wolf2. For example, /gpfs/wolf2/cades/stf007/proj-shared/my_data. You should see a list of your files and folders under the left “Path” Box.
Click on all files or folders that you want to transfer in the list. This will highlight them.
Click on the right side “Collection” box in the File Manager and type “NCCS Open DTN”
Click in the right side “Path” box and enter the path where you want to put your data.
Click the left “Start” button.
Click on “Activity“ in the left blue menu bar to monitor your transfer. Globus will send you an email when the transfer is complete.
User Assistance
If you need any assistance using CADES Baseline computing resources, send an email to: cades-help@ornl.gov.
User Policy
Oak Ridge National Laboratory’s (ORNL) Compute and Data Environment for Science (CADES) provides eligible customers with HPC compute resources in Open Research. The BASELINE HPC cluster is an NCCS-managed cluster and is integrated with the OLCF project and user management technology and software stack.
Acceptable Use
Computers, software, and communications systems provided by CADES are to be used for work associated with, and within the scope of, an approved project. The use of CADES resources for personal or non-work-related activities is strictly prohibited. All computers, networks, email, and storage systems are property of the US Government. Any misuse or unauthorized access is prohibited and is subject to criminal and civil penalties. CADES systems are provided to users without any warranty. CADES will not be held liable in the event of any system failure or data loss or corruption for any reason, including, but not limited to: negligence, malicious action, accidental loss, software errors, hardware failures, network losses, or inadequate configuration of any computing resource or ancillary system.
User Responsibilities
All CADES users must comply with ORNL security rules and with the following:
No moderate/confidential data should be mounted hosted or created on the Open Research Condo. Open science only.
DO NOT share your credentials, passwords, private keys, or certificates, with anyone.
Treat facility staff with respect and courtesy.
Conduct activities with the highest scientific, professional, and ethical standards.
Users must not intentionally introduce or use malicious software such as computer viruses, Trojan horses, or worms.
Users may not deliberately interfere with other users accessing system resources.
Users are accountable for their actions and may be held accountable to applicable administrative or legal sanctions.
Users are prohibited from taking unauthorized actions to intentionally modify or delete information or programs.
Use CADES resources responsibly, recognizing that both staff and equipment are in high demand.
Users must cooperate with cades staff on resource allocation, avoid overloading shared resources, such as the cluster login nodes, and modify workflow as prompted and directed by cades staff.
Lead effort to analyze and publish results in a timely manner.
Appropriately acknowledge CADES on all publications and presentations containing results from projects utilizing CADES resources and submit full citations of all publications resulting from research.
Application for Resources
Access to BASELINE is available to ORNL research and technical staff, by request, through MyOLCF. The request is made through the https://my.olcf.ornl.gov portal and requires your XCAMS ID. An activation notice will be sent when your resources are ready for use.
Condo Software Policy
The CADES software team will install user-requested software if it is deemed to be beneficial to the user community. Software installation requests will be evaluated based on stability, potential usage, and cost. If a software package is not available in a stable version and/or incompatible with the requested resource, or if a software is requested by only one user and it is unlikely for other users to use this software, the request may be denied. We recommend and encourage users to install such software in their own home directories, we can certainly provide assistance as needed. For licensed and other non-standard software packages, we will evaluate the request on a per-case basis and make a decision on installation. This policy will ensure a robust software set for the community and help the CADES software team to better manage a complex software infrastructure.
Data Retention
When a project ends and an account is closed out, account access is terminated, and any remaining data are deleted. Users are responsible for moving or saving any data that they would like to keep before their project ends and their access is closed out.
Purge Policy
To keep the scratch file system exceptionally performant, files that have not been accessed in 90 days may be purged. Please make sure that valuable data is moved off of these systems regularly. Special Requests and Policy Exemptions Users can request policy exemptions by using the request forms at https://cades.ornl.gov/special-request-forms/ or contacting the CADES support team (cades-help@ornl.gov). Requests are subject to review by the CADES Resource Utilization Council.
Acknowledging CADES
The following acknowledgment should be included in publications and presentations that contain work performed using CADES resources. This research used resources of the Compute and Data Environment for Science (CADES) at the Oak Ridge National Laboratory, which is supported by the Office of Science of the U.S. Department of Energy under Contract No. DE-AC05-00OR22725.